
Hi all!
I hope that your day is good enough. In this journal, I would like to explain about Google Kubernetes (GKE) upgrade, specifically using Blue-Green Strategy.
By default, GKE offers an automatic upgrade feature to our existing GKE cluster. We just have to make sure auto-upgrade is enabled, with a bit configuration, and the system will do an upgrade automatically. Sounds promising, right?
That strategy has a lot of benefits. First, it is less effort and easy to use because we don’t have to manually track and update the versions. It has better security management because GKE will ensure that the security of the selected version is updated.
But how about when we want to choose the specific version of Kubernetes for our existing cluster? For example, I want to use the newer version from the current version instead of the latest. How about our strategy when the automatic upgrade is still happening, but our application is crashing/failing, and we have to downgrade the version?
From the documentation here, downgrading a cluster is not recommended, and we cannot downgrade a cluster control plane from one minor version to another. For example, if your control plane runs GKE version 1.17.17, you cannot downgrade to 1.16.15. If we attempt to do that, we will get an error. We can just downgrade 1.17.17 to 1.17.16, if that version is still available.
The same thing will happen to node pool, based on the documentation here. If we want to downgrade the worker’s node, we have to create a new node pool with the previous version, drain the workers which use the latest version, and delete it. Lots of effort and pain.
So, what is the alternative? How do we avoid the pain and ensure the upgrading process is successful?
We can do this by using the upgrade manually strategy 🙂
Similar to common Kubernetes clusters, the manual upgrading process will consume more effort and time. But, we will have more control to ensure the upgrading process is successful and reduce the risk.
Using a manual process, we can choose the specific version of the Kubernetes cluster instead of the latest. But, to be honest, it also has a limitation. We cannot upgrade the cluster to more than one minor version at a time. So, if our version cluster is 1.22 and we want to upgrade to 1.24, we have to upgrade to 1.23 first and then upgrade it to 1.24. The reference is here.
The limitation is similar to the Kubernetes provided by officials. But, one thing we have to remember is the version provided by GKE is limited. As this journal writes, the latest version of Kubernetes is 1.25. But from the version provided by GKE is still 1.24. Version 1.25 is still in rapid channel (pre-production), and we have to wait 2-3 months until it is ready to be used in production.

GKE provided two strategies when we want to use a manual upgrade, SURGE (default) and BLUE-GREEN. What is the difference between both? The surge strategy uses a rolling method to upgrade nodes simultaneously in an undefined order. This strategy is better for our applications that tolerate disruptions until 60 minutes when graceful termination happens.
So, when our applications are less tolerant of disruption, it is better to use the blue-green strategy. Other than that, blue-green strategy also offers to cancel, resume, roll back, and complete features. This is a great solution if our workloads fail and we need to be rolled back to the old node configuration.
When we recap, the steps to do blue-green strategy upgrade are:
- Upgrade the control-plane version to the newer version
- Create a new worker node pool (call it a green pool) with the same version as control plane
- Drain and cordon nodes in the blue node pool (node pool with the previous version)
- Migrates the applications to the green pool
- Delete the blue node pool
- Test and verify
All right, let’s practice!
Let’s say I have a cluster named gke-dev1 in us-central1 region, and it uses 1.22.12-gke.2300 for the version.

By default, the upgrade strategy for node pool is SURGE which means

And we need to change to blue-green strategy by using the command below:

After that, upgrade the control plane:
Verify that the control plane is upgraded as below.

After that, create a green node pool that uses the same version as the control plane node


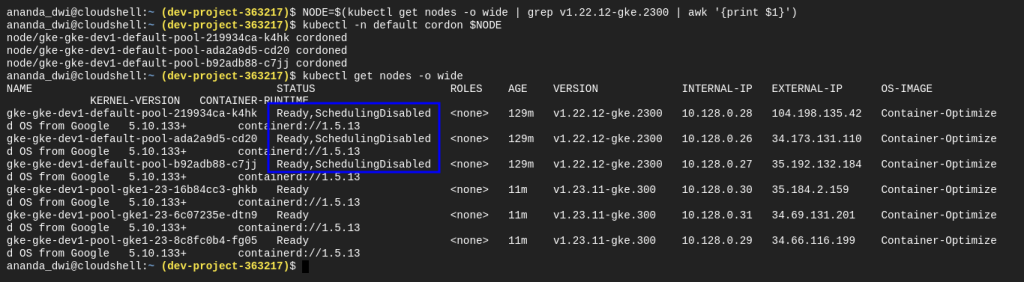
And then drain and cordon the blue node pool. This action ensures that new pods are not scheduled to the blue node pool.
As we can see below, the node status is changed to SchedulingDisabled.
After this, we have to reschedule the applications into the green node pool. Make sure the applications is healthy, and then we delete the blue node pool.
References:
- https://cloud.google.com/kubernetes-engine/docs/concepts/cluster-upgrades
- https://cloud.google.com/kubernetes-engine/docs/how-to/upgrading-a-cluster
- https://cloud.google.com/kubernetes-engine/docs/concepts/node-pool-upgrade-strategies
- https://kubernetes.io/docs/tasks/administer-cluster/kubeadm/kubeadm-upgrade/
Thank you!

Hi,
Thanks for your good tutorial, easy to understand.
Btw in recap section point no.5, i believe it should be blue node pool that you have to deleted, not a green one.
Cheers.
LikeLike
Hi! Thank you for your feedback and I appreciate it. I have edited that.
LikeLike